
Introduction
If you are looking to do easy craft supply organization in a 3 tier rolling cart, here are some great ideas to make it simple and sustainable for the long term. If you’re in a hurry, here’s the gist: declutter your craft supplies, make everything visible by compartmentalizing in containers, then label your containers. If you have more time, read on!

The monthly focus for the Clean Mama cleaning routine in July is Organizing Systems, so it’s a great excuse for me to get my craft supply organization under control. If you want to know more about the Clean Mama cleaning routine, you can check out my review post.
Benefits of a 3 Tier Rolling Cart for Craft Supply Organization
Previously, I had been organizing my craft supplies in plastic containers on the shelf in my closet. This was not working well, since I couldn’t really see inside the bins and hadn’t even taken the time to label any of them. Needless to say, it was a bit of a mess up there.


Seeing as you’re reading this post, I probably don’t need to convince you of the benefits of a 3 tier rolling cart for craft supply organization. But just in case, if you live in a small space like we do, a 3 tier rolling cart enables you to keep things organized and visible, while also being able to tuck it away and maximize your square footage when it’s not being used. I picked up our cart from Target for $35, but Ikea has a great option, as does Amazon.
Step 1: Declutter Your Craft Supplies

None of us like to think about doing this first, but if you truly want an organized and usable craft supply cart, you can’t skip this step. In decluttering my own craft supplies, I found a bunch of things I forgot I had! Some of it I needed to part with, but some I’m going to keep and organize so I can actually see it and remember to use it! Which leads me to step two…
Step 2: Divide and Compartmentalize
I think about craft supply organization in a 3 tier rolling cart the same way I think about organizing a pantry. Everything doesn’t have to look perfectly beautiful, but everything does have to be perfectly visible so I know what I have and what I need to replenish. Thus, the next step is to divide and compartmentalize
Group Like Items with Like Items

This is a rule of thumb for organizing anywhere in your house, but it definitely holds true when you’re trying to do easy craft supply organization in a 3 tier rolling cart. Make sure things are grouped together by type of item so you can easily grab something when you need it, or see when you’re close to running out of something. Plus, when everything is grouped together by type of item, it just looks so tidy and satisfying! 🙂
Compartmentalize with Containers
Whew! Say that five times fast! Keep your items separate with small containers that are easy to arrange, rearrange, and label. I found these collapsible bins at Target in a pack of 3 for $5. I love them because they’re small, they’re easy to squish anywhere, and I like how they match my cart.

I also found these adorable Wood crates with handles at Dollar Tree for a dollar each, and they also have Wood slat crates that are super cute, as well.

In the spirit of keeping things on a small budget, I also removed labels from empty tin cans, washed them out and spray painted them black to hold all my pens and pencils. They work great!

Step 3: Label
This one is self-explanatory, but I’d encourage you to get creative with your labels. Have some fun! You can pick up sticky chalkboard labels from Amazon, or these adorable clothespin chalkboard tags I found at Dollar Tree.

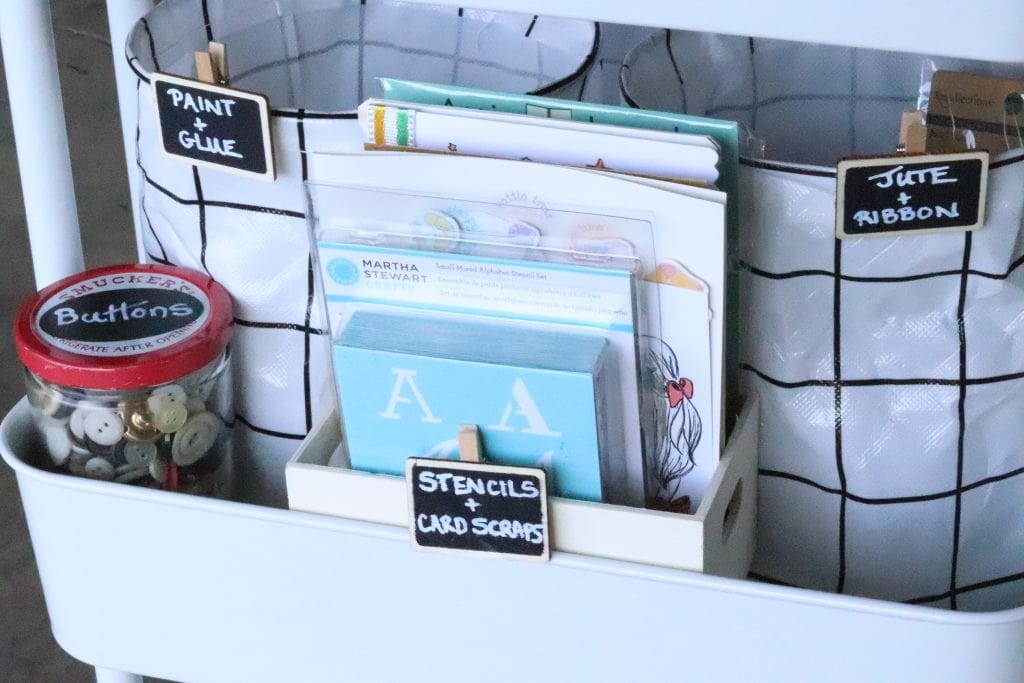

Whatever you choose, make sure your labels are clear and easy to see, because when push comes to shove, you want your craft cart to be functional and easy to use. If it’s not, chances are it will quickly become disorganized and you’ll be left frustrated, feeling like you’re back to square one.
Conclusion

I hope this was helpful for you as you plan easy craft supply organization in a 3 tier rolling cart. Whatever cart you choose, whatever containers you pick, and whatever labels you apply, you can tackle this project knowing you’ll have a great end result. There is nothing better than going to make a card, going to scrapbook or going to paint, and knowing that everything will be right where you need it and you can jump right into your creative project.
Pin It For Later

More From a Flourishing Place
How to Organize Toys in the Living Room: 2 Easy Principles
Yes! 7 Steps to Get Rid of Clutter Now
Two Under Two: How to Be Organized at Home with a Baby and a Toddler
Oh I LOVE this!! I’ve been thinking about getting one of these and I just love the way you have organized it.
Thanks Stephanie!
This super organized cart makes my heart happy. I love how tidy and organized it is. Easy to follow steps that anyone can follow to stay organized while they craft. Thanks for sharing!
Thanks! Glad you liked it, Sarah!
I’ve been needing better craft supply organization ideas. It’s currently overflowing out of one of our kitchen cabinets, haha!
I feel you there! The top shelf of my closet was not working for me! 🙂
Such a great system!! Love this idea!
Thanks Candice!